Live streaming has evolved beyond simple camera-to-viewer broadcasts. Today’s audiences expect interactive, engaging content with visual effects, branding elements, and augmented reality features.
This guide walks you through integrating DeepAR (real-time AR filters) and Custom Canvas Overlays (logos, watermarks) into an Android live-streaming app powered by Ant Media Server. The sample project has two ready-to-run Activities: DeepARActivity.java and CustomCanvasActivity.java. The key to making both work is IWebRTCClient.StreamSource.CUSTOM — it tells the Ant Media Server’s WebRTC Android SDK to let you push video frames yourself, so you can insert DeepAR or Canvas drawing in between the camera and the encoder.
Both approaches leverage Ant Media Server’s WebRTC capabilities to deliver low-latency, high-quality streams with custom visual enhancements applied in real-time.
GitHub Repository: https://github.com/USAMAWIZARD/AntMedia-DeepAR-And-Overlay
Table of Contents
Prerequisites
Have these ready before you begin:
- Android Studio
- Git
- Android device API 21+ (physical recommended)
- DeepAR account & license key
- Ant Media Server Enterprise Edition
- Basic Java / Android knowledge
ℹ️ Get a free DeepAR license key at developer.deepar.ai → Projects → New Project → App → Android App. Enter your app’s exact package name (used here – com.example.antmediacustomcanvasstreaming).
This needs to be set in the strings.xml under: App → res → values → themes in the next step.
ℹ️ Get started with the Ant Media Server on AWS Marketplace – 7 days free trial.
Clone the Sample Project & Open in Android Studio
The fastest starting point is to clone the reference project that already has the project structure, Gradle files, and both Activity samples – DeepARActivity.java and CustomCanvasActivity.java pre-configured.
git clone https://github.com/USAMAWIZARD/AntMedia-DeepAR-And-Overlay.git
- Open Android Studio → File → Open → select the cloned folder
- Wait for the initial Gradle sync to complete (status bar shows “Gradle sync finished”)
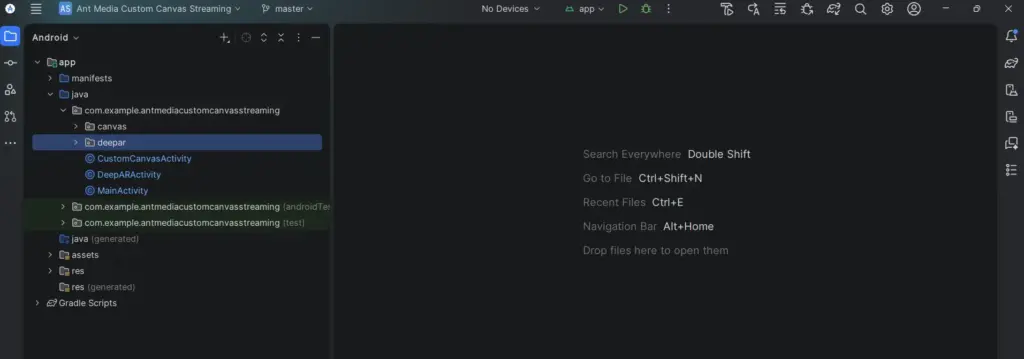
- In the Project panel you will see
app/src/main/java/containingDeepARActivity.javaandCustomCanvasActivity.java
Run on Device & Verify the Stream
- Connect your Android device via USB. Enable USB Debugging in Settings → Developer Options
- In Android Studio select your device in the toolbar, then press ▶ Run
- On first launch, grant Camera and Microphone permissions when prompted
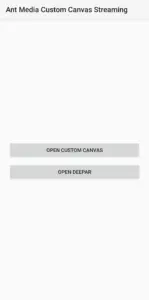
- The Android app once launched will show both the options to choose – Open Custom Canvas and Open DeepAR
Start Streaming — the app connects and publishes to the Ant Media Server.
- The server URL in this sample is already set to –
wss://test.antmedia.io:5443/LiveApp/websocket - On the DeepAR activity screen, tap the Start button. Then open a browser on your laptop and go to – https://test.antmedia.io:5443/LiveApp/player.html?id=test1
- You should see your AR-filtered live stream playing in the browser!
⚠️ For AR effects, use a physical Android device. Emulator cameras don’t give DeepAR a real face to track, so filters won’t look meaningful. The streaming part works on emulators, but the AR preview will be flat.
You’re Live!
Here’s exactly what you’ll see on your device and in the browser when everything is running correctly.
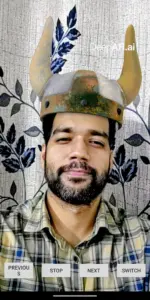
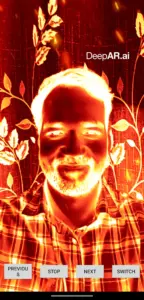
In this sample, we have included all the filters of DeepAR Filter Pack. Clicking Next will take you to all the samples.
Let’s Dive Deep
Now that we have seen the magic, let’s dive deep into DeepAR to understand the implementation and working.
DeepAR Activity – Augmented Reality for Live Streaming
View Source Code: DeepARActivity.java
What is DeepAR?
DeepAR is an augmented reality SDK that enables real-time face tracking, filters, and effects on mobile devices. When combined with Ant Media Server, you can stream AR-enhanced video to your audience, creating engaging and fun live experiences.
The DeepAR Streaming Experience
The DeepARActivity brings the power of augmented reality to your live streams. Imagine going live with a Viking helmet, neon devil horns, or even an elephant trunk – all rendered in real-time and streamed to your viewers.
How It Works (High Level)
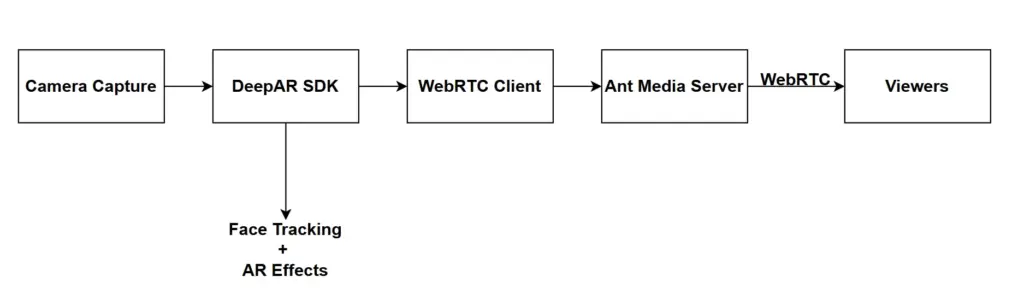
- The camera captures your video feed
- Each frame passes through the DeepAR SDK, which applies face tracking and the selected AR effect
- The processed frame is sent to Ant Media Server via WebRTC
- Your viewers see the AR-enhanced stream in real-time with ultra-low latency
Use Cases
- Entertainment Streaming: Add fun filters to engage your audience during live shows
- Gaming Streams: React to gameplay with expressive emotion effects
- Virtual Events: Create memorable virtual appearances with unique AR effects
- Social Streaming: Stand out with creative filters on your live broadcasts
Code Overview
Let’s take a brief look at how the DeepARActivity is structured:
1. Initialization
The activity initializes DeepAR with a license key and sets up the camera and streaming components:
deepAR = new DeepAR(this);
deepAR.setLicenseKey("your-license-key");
deepAR.initialize(this, this);

initializeEffects();
setupCamera();
setupStreamingAndPreview();
2. WebRTC Client Setup
The Ant Media WebRTC client is configured to use a custom video source, which allows us to feed AR-processed frames:
webRTCClient = IWebRTCClient.builder()
        .setServerUrl("wss://test.antmedia.io/LiveApp/websocket")
        .setActivity(this)
        .setVideoSource(IWebRTCClient.StreamSource.CUSTOM)
        .setWebRTCListener(createWebRTCListener())
        .setInitiateBeforeStream(true)
        .build();
3. Camera Frame Processing
Each camera frame is captured via CameraX’s ImageAnalysis and fed to DeepAR for AR processing:
imageAnalysis.setAnalyzer(ContextCompat.getMainExecutor(this), image -> {
    try {
        feedDeepAR(image);  // Send frame to DeepAR SDK
    } finally {
        image.close();
    }
});
4. Effect Switching
Users can cycle through effects using simple navigation methods:
public void nextEffect(View v) {
    currentEffect = (currentEffect + 1) % effects.size();
    deepAR.switchEffect("effect", getFilterPath(effects.get(currentEffect)));
}

public void previousEffect(View v) {
    currentEffect = (currentEffect - 1 + effects.size()) % effects.size();
    deepAR.switchEffect("effect", getFilterPath(effects.get(currentEffect)));
}
5. Stream Control
Starting and stopping the stream is handled with a simple toggle:
public void startStopStream(View v, String streamId) {
    if (!webRTCClient.isStreaming(streamId)) {
        ((Button) v).setText("Stop");
        webRTCClient.publish(streamId);
    } else {
        ((Button) v).setText("Start");
        webRTCClient.stop(streamId);
    }
}
The DeepARRenderer handles the OpenGL rendering and sends processed frames to the WebRTC client for streaming.
Custom Canvas Activity – Branded Overlays for Professional Streams
View Source Code: CustomCanvasActivity.java
Why Custom Overlays?
While AR effects are fun, sometimes you need professional branding elements on your stream – your logo, text announcements, watermarks, or promotional graphics. The CustomCanvasActivity provides exactly this capability.
The Custom Overlay Experience
This activity demonstrates how to add static visual elements on top of your camera feed before streaming. Think of it as having your own broadcast graphics system built right into your app.
Built-in Overlay Features
The sample implementation includes two types of overlays:
- Image Overlay
- Displays a custom image (logo or branding graphic)
- set custom image positionx
- set custom image size
- Perfect for watermarks and brand logos
- Text Overlay
- Renders custom text directly on the video feed
- Customizable font size (64pt in the sample)
- Custom colors (red text in the sample)
- Set custom position.
- Great for titles, announcements, or hashtags
How It Works (High Level)
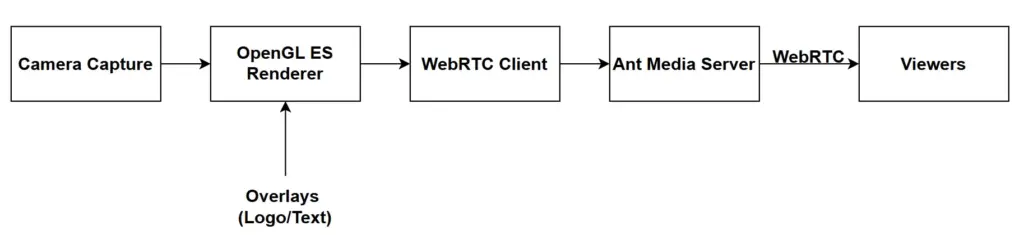
- CameraX captures your camera feed
- An OpenGL ES renderer processes each frame
- Custom overlays (images and text) are composited onto the video
- The final composited frame streams to Ant Media Server via WebRTC
- Viewers receive your branded stream in real-time
Use Cases
- Corporate Streaming: Add company logos and branding to internal broadcasts
- Educational Content: Display titles, chapter names, or key points
- News & Media: Show channel branding and lower-thirds
- Product Launches: Overlay promotional text and graphics
- Influencer Streams: Watermark your content with your brand
Code Overview
Let’s explore how the CustomCanvasActivity brings overlays to your stream:
1. WebRTC Client Setup
Similar to DeepAR, we configure the WebRTC client to use a custom video source:
webRTCClient = IWebRTCClient.builder()
        .setServerUrl("wss://test.antmedia.io/LiveApp/websocket")
        .setActivity(this)
        .setVideoSource(IWebRTCClient.StreamSource.CUSTOM)
        .setWebRTCListener(createWebRTCListener())
        .setInitiateBeforeStream(true)
        .build();
2. Creating Overlays
Overlays are created when the OpenGL surface is initialized. You can add image overlays and text overlays with custom positioning:
imageProxyRenderer = new ImageProxyRenderer(webRTCClient, this, surfaceView, new CanvasListener() {
    @Override
    public void onSurfaceInitialized() {
        // Image overlay: positioned at 80% X, 80% Y with 20% size
        logoOverlay = new Overlay(getApplicationContext(), R.drawable.test, 0.8f, 0.8f);
        logoOverlay.setSize(0.2f);

        // Text overlay: "Hello" in red, 64pt font, positioned at center X, -30% Y
        textOverlay = new Overlay(getApplicationContext(), "Hello", 64, Color.RED, 0f, -0.3f);
        textOverlay.setSize(0.12f);
    }
});
3. Camera Frame Processing
Each camera frame is submitted to the renderer for overlay compositing:
imageAnalysis.setAnalyzer(ContextCompat.getMainExecutor(this), new ImageAnalysis.Analyzer() {
    @Override
    public void analyze(@NonNull ImageProxy image) {
        imageProxyRenderer.submitImage(image);  // Send frame to renderer
        if (surfaceView != null) {
            surfaceView.requestRender();  // Trigger OpenGL render
        }
        image.close();
    }
});
4. Camera Switching
Switching between front and back cameras is handled by the CameraProviderHelper:
switchCam.setOnClickListener(new View.OnClickListener() {
    @Override
    public void onClick(View v) {
        cameraProviderHelper.switchCamera(imageAnalysis);
    }
});
The ImageProxyRenderer handles the OpenGL compositing of overlays onto the camera frames before sending them to the WebRTC client.
The Ant Media Server Advantage
Both activities connect to Ant Media Server using WebRTC, which provides:
- Ultra-Low Latency: Sub-second delay for real-time interaction
- Scalability: Handle thousands of concurrent viewers
- Cross-Platform Playback: Viewers can watch on any device or browser
- Adaptive Bitrate: Automatic quality adjustment based on network conditions
Frequently Asked Questions
Why is setVideoSource(StreamSource.CUSTOM) essential?
By default, IWebRTCClient opens the camera itself and manages the entire video pipeline internally. When you set StreamSource.CUSTOM, you tell the SDK to skip its own camera capture and wait for you to push frames manually via sendFrameForProcessing(). This is what makes it possible to insert DeepAR (or Canvas drawing) between the raw camera output and the WebRTC encoder. Without this flag you would be streaming an unprocessed camera feed with no AR applied.
The app crashes at launch with a license error. What’s wrong?
Almost always a package name mismatch. Your DeepAR license key is generated for one specific Android applicationId. Check three things: (1) the applicationId in your app/build.gradle, (2) the package name you typed when creating the project at developer.deepar.ai, (3) the key you pasted into strings.xml. All three must be identical — case-sensitive. Also make sure you’re using the Android key, not a Web or iOS one.
Do I need Ant Media Server Enterprise Edition for this?
Yes. Only the Enterprise Edition supports WebRTC streaming.
Conclusion
Whether you’re looking to add fun AR effects to engage your audience or professional branding to your streams, Ant Media Server provides the foundation for high-quality, low-latency broadcasts. The DeepARActivity and CustomCanvasActivity demonstrate just how easy it is to elevate your live streaming experience on Android.
The best part? Both approaches can be customized and extended to match your specific needs. Add your own AR effects, design custom overlays, or combine both techniques for the ultimate streaming experience.
Ready to take your live streams to the next level? Clone the project and start experimenting today!


